Exploring has made me into aself confessed bag whore and I’ve been on the search for the perfect exploring bag for years and years, the thing is there isn’t really any such thing. As long as what you’ve got gets your kit where you need to go without falling apart or damaging your stuff then it doesn’t matter.What is true though are certain bags are better in certain environments, for example in tight, flooded or really muddy spaces I prefer my Sitka Gearslinger as I can spin him round and access whatever I want without taking it off or let the bag touch the ground…..quite useful if you are in four feet of water :-)Every now and then I get an itch to try something new though but invariably they are on eBay within a few days as I’ve not done my homework properly or some ‘feature’ of the bag has annoyed me and I’ve fell out of love with it. My ‘daily driver’ up until recently has been my Maxpedition Sitka Gearslinger as he can carry my Canon, various flashlights, Gas Detector, batteries, bits of climbing gear and a side mounted tripod. More importantly its f**ing Bomb Proof which I like in a bag. I’ve had it years but it’s probably not quite as big as it should be……I hate carrying big bags but should probably upgrade him to a Kodiak Gearslinger which is the exact same design just a touch larger…
The last few weeks I’ve been taking out a Lowe Pro Flipside 300 AW that was gifted to me. He’s great in some respects, light, totally customisable and padded inside so I can get my Canon, GoPro, lighting rig, flashlights etc. in plus it has a really neat tripod carrying solution….BUT….the shoulder straps feel VERY flimsy compared to the OTT build qualityoftheMaxpedition stuff and you have to take the damn thing off to access anything inside.
Lowe Pro Flipside 300 AW
The main two I keep going back to though are the Sitka Gearslinger if I’m somewhere out of sight or if I’m trying to blend in a bit the 5.11 Rush 12, he’s great as I can get the camera and tripod inside the bag so is much less conspicuous. For silly ass wet/flooded sites I take an Ortlieb heavyweight dry bag in an attempt to not kill another DSLR.
The new kid on the block is a Maxpedition Colossus which I’ve not taken out yet but like the fact I can drop the Canon/Tokina rig straight into him and access it quickly. I’m hoping it will be perfect for handheld only trips where the tripod stays at home but I reckon it will take a side mounted tripod quite easily if I needed to.
If you follow this blog you might be aware of an incident that caused me an amount of problems, sadly the upshot of that day has since had even worse fallout and has been the reason for radio silence on this blog…
The place is really my nemesis, we’ve been going there for a long time and it doesn’t reveal its secrets easily, hard work and an often dangerous environment are required to get any payoff. We have found really neat stuff in far flung corners that makes all the slog worth the effort. In fact certain things, that have become obsessional, still elude me and it was just this said ‘thing’ that was on the menu when karma dealt me a sucker punch.
Its true my wad0rs split and I dropped a few quids worth of Lensers into the murky depths but the damage was far far worse as I was to find out. The Thrunite is now working, although it took several days for it to dry out, the ‘sinking tripod’ issues turned out to be the column clamp failing on my Velbon E-540 of which I am waiting to get a spares/repair price for.
The icing on the cake was when my 40D stopped working….yep…d-e-a-d. All of the buttons apart from the shutter had stopped working, the display had gone and the camera just sat there with the autofocus chattering away to itself trying to focus on an invisible/imaginary subject in the distance….FUBAR!!
It was left to dry for a week or so but still refused to play so it got shipped off to the camera doctors while I started searching for a new Canon body (just in case). Two weeks later and several hundred pounds worse off it got couriered back to me having been totally stripped, lovingly rebuilt (with several new parts) and calibrated to Canon factory standards, oh and they cleaned all the mine gunk off it for me too 🙂
The repair slip said my camera had suffered ‘contamination and corrosion’ LOLZ
So, I’m nearly back in the game…stand by for updates in the coming weeks 🙂
Abandoned railway tunnels can be a bit dull after you’ve done a few, as a rule they are dark, straight and mostly featurless. I’ve had my fill I suppose and they don’t really ‘blow up my skirt’ anymore, however Catesby presented itself as an opportunity and it was rude to say no…
Catesby Tunnel is a little more interesting than your average tunnel, mainly ‘cos its a big boy. I believe it’s somewhere around the fifth longest, behind stuff like Rhondda, both Woodhead’s, and Standedge.
Interesting features that also set this tunnel aside from many are the culvert that runs the entire length of the tunnel under the tunnel floor, accessed by catchpits (yes I stupidly crawled in there with no waders, up to my waist in freezing water to get the shot below), the three large Rest Cabins built into the up-side wall (one found to contain a sadly ransacked GeoCache) and the five air-shafts that these days spectacularly pour water down into the already flooded tunnel (the north end was knee hight on this visit).
Not many photo’s as I managed to flood my 40D and it packed up for a few hours….
The 2,997-yard structure was cut by T Oliver & Son of Horsham as part of the Great Central’s ‘London Extension’ construction contract No.4. It passes through the upper beds of the lower Lias and the lower beds of the middle Lias. 27 feet wide and 25 feet 6 inches high, Catesby is straight throughout and on a rising gradient of 1:176 to the south, with the summit of this section reached as daylight resumes.
Its creation demanded round 290,000 cubic yards of mining. Work to sink the first shaft began on 18th February 1895 and the last length was keyed in on 22nd May 1897 – a remarkably quick average rate of 110 yards per month. Progress was greatly accelerated by the use of Ruston steam navvies (cranes).
The tunnel was mostly driven from nine construction shafts, each equipped with wooden headgear which was used to lower materials to the men working beneath. None though was permitted within 500 yards of the north portal due to the landowner’s wish that the privacy of his residence, close to the workings, be maintained. As a result, 264 yards through very heavy ground had to be constructed by means of a 12x10ft bottom heading and break-ups. This proved liable to breakages and one part completely collapsed. The surrounding strata was under significant pressure which resulted in a heavy lining of seven rings in the arch and side walls, with six rings in the invert. These were divided into 10-foot sections.
Cut-and-cover was used for the first 44 yards from the north portal. The length adjoining this had so little ground above it that the two crown bars were laid from a trench on the surface.
The remainder of the tunnel proved relatively light work and was driven full-sized without headings. Here the lining is mostly five rings thick with a four-ring invert, all faced with Staffordshire brindle and built in lime mortar. Around 30 million bricks were swallowed up by the structure.
Very little water ingress was experienced, amounting to around 80 gallons per minute. Chases were built into the back of the brickwork at intervals, leading to pipes built through the side wall at rail level. Water was then discharged into a culvert in the six-foot, accessed via deep catchpits.
Ventilation is provided by five shafts. Four of these are 10 feet in diameter but the northernmost – 1,250 yards from the entrance – is 15 feet wide to provide greater air flow. The landowner did not want his view blighted by rising smoke either! The first belch from coal traffic occurred on 25th July 1898.
Trackworkers were relatively well served with regular refuges provided on both sides and three rest cabins built into the Up side wall. One is located directly opposite the tablet that marks the “half way” point.
Both lines through the tunnel were inspected by the local ganger twice each day. In the winter of 1906, this role was carried out by Joseph Turner, as it had been for the previous 18 months. At about 4:20pm on 4th January he completed an examination of the Down line.
Half-an-hour later, a London-Manchester express with upwards of 50 passengers on board entered the south end of the tunnel at around 60mph. As it approached the fifth shaft, a rail broke beneath the locomotive and all five coaches behind it derailed, ripping up 450 yards of track. The last carriage became detached and came to a stand foul of the adjacent Up line as a goods train was approaching. Only prompt action by the driver, who put down a detonator, and the guard, who sounded the whistle, prevented a collision.
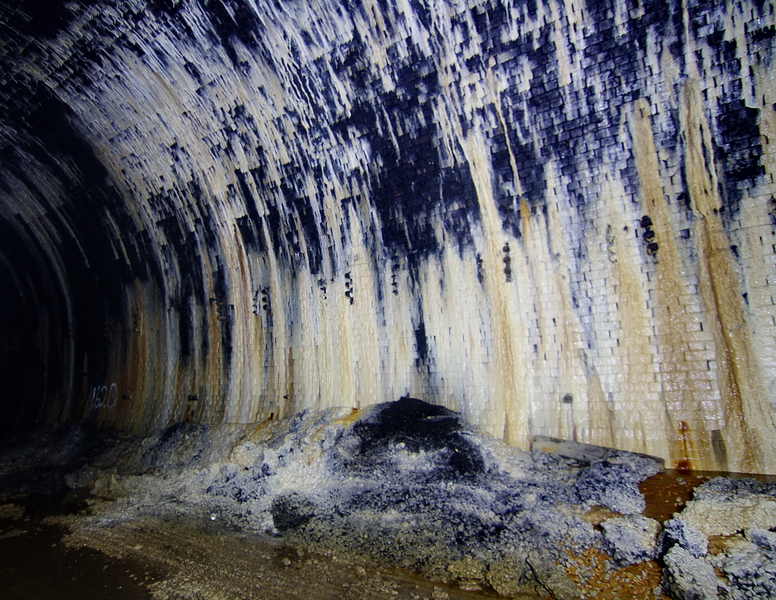
Catesby Tunnel retired from operational service on 3rd September 1966 since which time the permanent way has been removed. Water ingress compounded by a blocked drain just north of the fifth shaft means that, in places, it is flooded to a depth of a foot or more. Calcite makes it presence felt with some extraordinary formations.
My trusty Panasonic Lumix TZ6 has produced every picture you can see on this blog, in fact i’ve taken over 10,000 shots with it, but it has limitations, in fact it has many pluses too such as its size and weight and the awesome Leica lens. However if I want to take better pictures then I need better toys so I dumped a bunch of stuff on eBay which paid for both of these guys. I’m still gonna keep the Lumix as its a great shooter but really want to start to sue these more.
Canon EOS 40D, bought in October last year from a friend and sat on a shelf gathering dust while I sold more stuff on eBay to pay for some quality glass. Two hours ago DHL showed up with the glass, an Ultra Wide Angle Tokina 11-16mm F2.8, all the way from Germany. This is where the fun starts as I have to learn how to use these guys properly…..


